| Oracle Procedural Gateway® Visual Workbench for WebSphere MQ Installation and User's Guide 10g Release 2 (10.2) for Microsoft Windows (32-Bit) Part Number B19082-01 |
|
|
View PDF |
| Oracle Procedural Gateway® Visual Workbench for WebSphere MQ Installation and User's Guide 10g Release 2 (10.2) for Microsoft Windows (32-Bit) Part Number B19082-01 |
|
|
View PDF |
This chapter describes how to use the Oracle Procedural Gateway Visual Workbench for WebSphere MQ to connect to a PG4MQ Visual Workbench repository, create new data profiles, update and remove data profiles associated with an interface profile, create new message profiles, update and remove a message profile associated with an interface profile, create and update MIPs, test the message queuing gateway associated with a MIP, compile a MIP, use the MIP templates to test the generated MIP and the data conversion package, and prepare a MIP for production.
This chapter contains the following sections:
During a typical PG4MQ Visual Workbench development session, you do the following:
Start the Oracle Procedural Gateway Visual Workbench for WebSphere MQ by double-clicking its icon in the Start menu list of programs in the Oracle for Microsoft Windows (32-bit) folder, then connect to the PG4MQ Visual Workbench for WebSphere MQ.
See Also:
"Starting the PG4MQ Visual Workbench and Connecting to a Repository" for more informationCreate one or more data profiles for the messages you want to exchange with a non-Oracle application. For example, for COBOL messages, import the corresponding COBOL copybook to create the data profile. The PG4MQ Visual Workbench maintains data profiles in a repository at the Oracle server.
See Also:
"Creating a Data Profile" for more informationCreate one message queue profile to specify how and where inter-application messages are to be sent or retrieved. The PG4MQ Visual Workbench stores the message queue profile in a repository.
See Also:
"Creating a Message Queue Profile" for more informationUsing the PG4MQ Visual Workbench Wizard, define the interface profile by selecting one or more data profiles and one message queue profile to associate with the interface. The PG4MQ Visual Workbench automatically generates the MIP.
See Also:
"Creating an Interface Profile and Generating a MIP" for more informationTest the message queuing gateway associated with the MIP.
See Also:
"Testing the Gateway" for more informationCompile the MIP in the PG4MQ Visual Workbench repository.
See Also:
"Compiling the MIP" for more informationComplete the MIP procedures in the PG4MQ Visual Workbench repository.
See Also:
"Using the MIP Templates" includes information about testing the MIP procedures.Compile the MIP on the production Oracle server, and test it there.
See Also:
"Preparing the MIP for Production" for more informationStart the PG4MQ Visual Workbench by double-clicking its icon in the Start menu list of programs in the Oracle for Microsoft Windows (32-bit) folder. The Connect dialog box appears. (Refer to Figure 6-1)
Figure 6-1 Dialog Box to Connect to the Repository Server
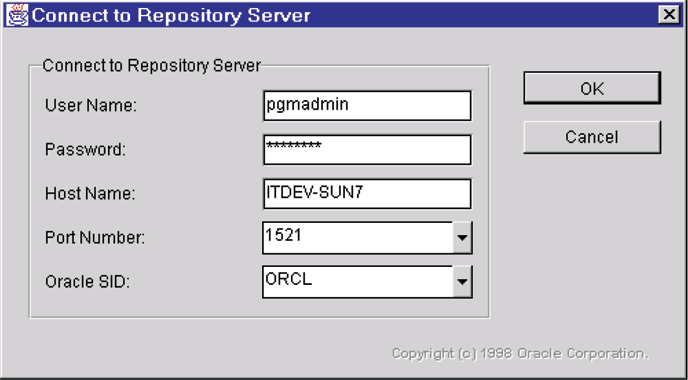
Modify the fields in the Connect dialog box to identify the computer where the PG4MQ Visual Workbench repository is located, then click OK.
After connecting to a PG4MQ Visual Workbench repository, the PG4MQ Visual Workbench window shows information about it. (Refer to Figure 6-2)
Figure 6-2 PG4MQ Visual Workbench Repository Window
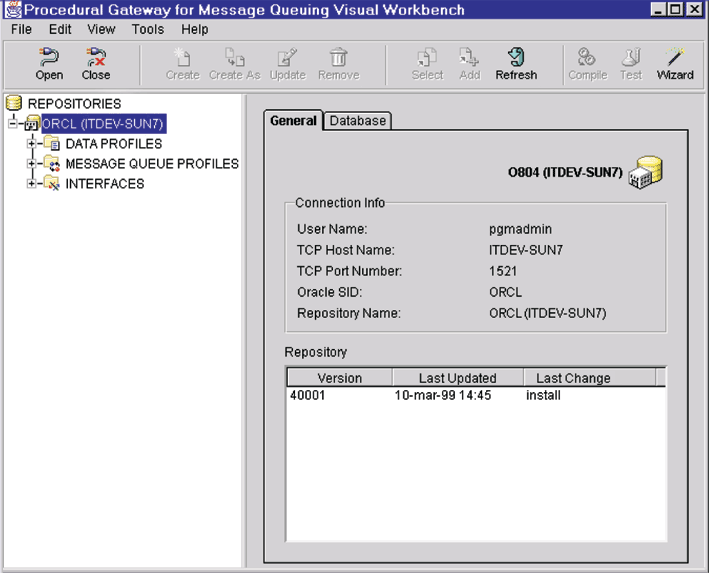
The example shows the expanded PG4MQ Visual Workbench repository directory tree and the General panel containing connect information and the repository's history of events. Select the Database tab to see information about the Oracle server where the PG4MQ Visual Workbench repository resides.
To connect to another repository, click the Open icon in the tool bar and enter the suitable connect information in the dialog box.
You can start actions in the PG4MQ Visual Workbench by clicking the suitable icons in the tool bar, or by opening the suitable drop-down list on the menu bar, then selecting a function from the menu. For example, to connect to a repository, you can open the File menu and select Open Repository.
After connecting to a PG4MQ Visual Workbench repository, create one or more data profiles. Data profiles define the data definitions that the PG4MQ Visual Workbench uses to map between non-Oracle data types and PL/SQL data types. The PG4MQ Visual Workbench maintains these definitions in the repository at the Oracle server.
For example, to create a COBOL data profile in a PG4MQ Visual Workbench repository:
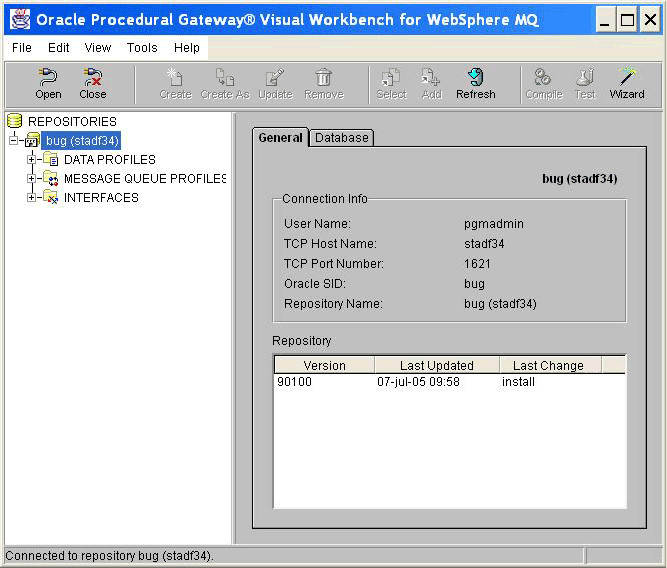
Open the repository by double-clicking the repository icon or by clicking the plus sign next to the repository icon.
Figure 6-3 Click the plus icon to open the repository
Open the Data Profiles folder.
Select the COBOL folder by clicking it once.
Click the Create icon in the tool bar. The Define COBOL Data Definition dialog box appears. (Refer to Figure 6-4).
Figure 6-4 Dialog Box to Define COBOL Data Definition
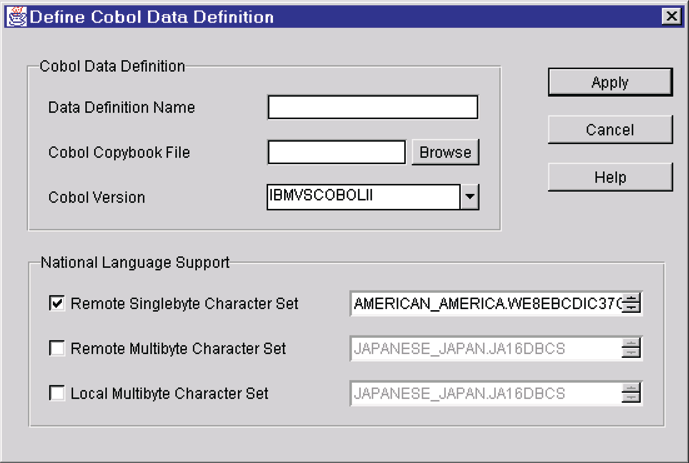
| Terms | Description |
|---|---|
| Data Definition Name | Name of the COBOL data definition to map to PL/SQL. The Data Definition Name:
|
| COBOL Copybook File | Name of the COBOL copybook file containing the structure of the COBOL data definition. The PG4MQ Visual Workbench uses this file to determine the correct mapping to PL/SQL. Use Browse to search your local computer for copybook files. The sample copybook files are inORACLE_HOME\pg4mqvwb\demo\cobol, where ORACLE_HOME is the directory in which the PG4MQ Visual Workbench is installed. See Also: Chapter 5, "Installation" for more information. |
| COBOL Version | Must be IBMVSCOBOLII |
| National Language Support | Specifies the character sets for data conversion between the local and remote systems:
|
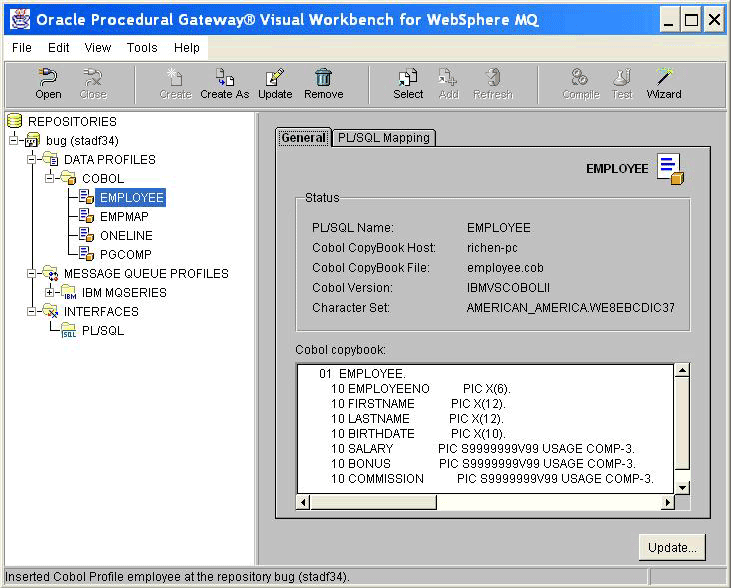
After entering the data definition information, click Apply. The PG4MQ Visual Workbench creates the data mapping to PL/SQL in the repository and displays the copybook and resulting mapping information.
The following example shows a newly created data profile named EMPLOYEE and its copybook file. (Refer to Figure 6-5).
Figure 6-5 Copybook and Mapping Information for EMPLOYEE Data Profile
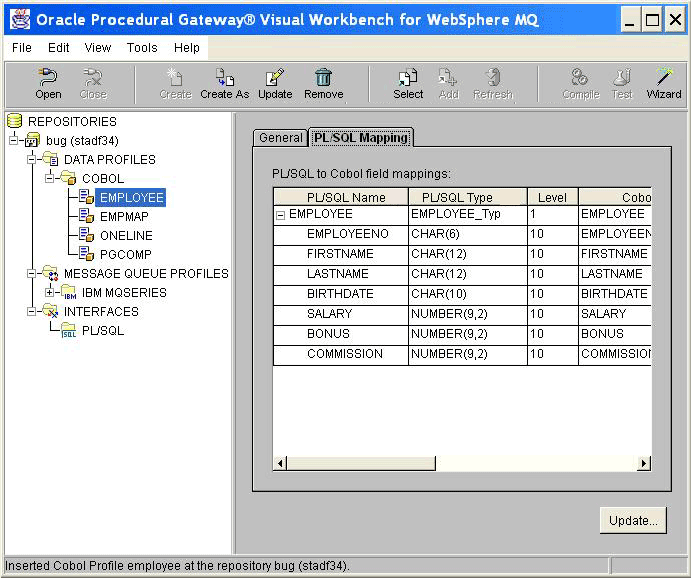
Select the PL/SQL Mapping tab to see the PL/SQL mapping for the new data profile. (Refer to Figure 6-6).
Figure 6-6 PL/SQL Mapping for EMPLOYEE Data Profile
The following example describes how to update a COBOL data profile:
Open the PG4MQ Visual Workbench repository.
Open the Data Profiles folder.
Open the COBOL folder.
Select the data profile to update by clicking it once.
Click the Update icon in the tool bar.
The Define COBOL Data Definition dialog box appears.
See Also:
"Creating a Data Profile" for details about this dialog boxModify the properties as necessary, then click Apply.
A dialog box asks you to confirm the update. (Refer to Figure 6-7.)
Figure 6-7 Dialog Box to Update a Data Profile

Click OK to confirm the update.
Updating a data profile that is associated with an interface updates the interface profile and the generated MIP. Before updating the data profile, the PG4MQ Visual Workbench prompts you to confirm the change.
This example tells how to remove a COBOL data profile:
Open the PG4MQ Visual Workbench repository.
Open the Data Profiles folder.
Open the COBOL folder.
Select the data profile to update by clicking it once.
Click the Remove icon in the tool bar.
A dialog box asks you to confirm the removal. (Refer to Figure 6-8.)
Figure 6-8 Dialog Box to Remove a Data Profile

Click OK to remove the data profile.
Removing a data profile that is associated with an interface removes the data profile both from that interface profile and from the generated MIP. Before removing the data profile, the PG4MQ Visual Workbench prompts you to confirm the removal.
After connecting to a PG4MQ Visual Workbench repository and creating one or more data profiles, create a message queue profile. The message queue profile specifies how and where inter-application messages are to be sent and retrieved. The PG4MQ Visual Workbench maintains these definitions in the PG4MQ Visual Workbench repository at an Oracle server, where the message queuing system accesses it using a message queuing gateway.
For example, to create a message queue profile for a WebSphere MQ system:
Open the PG4MQ Visual Workbench repository by double-clicking the repository icon or by clicking the plus sign next to the repository icon.
Open the Message Queue Profiles folder.
Select the WebSphere MQ folder by clicking it once.
Click the Create icon in the tool bar. The MQSeries Properties dialog box appears. (Refer to Figure 6-9.)
Figure 6-9 Dialog Box for MQSeries Properties
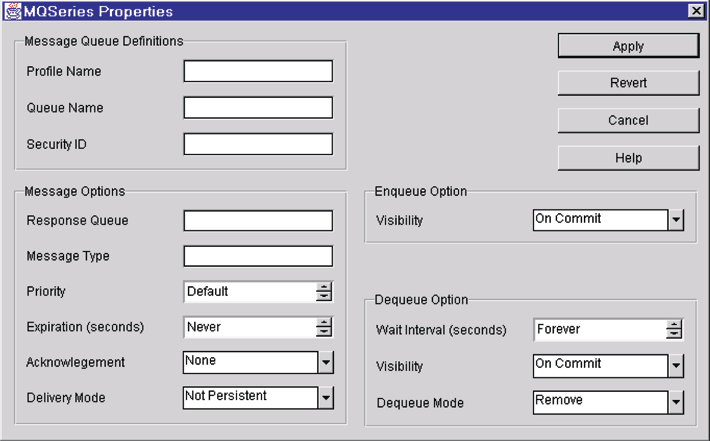
After entering the message queue information, click Apply.
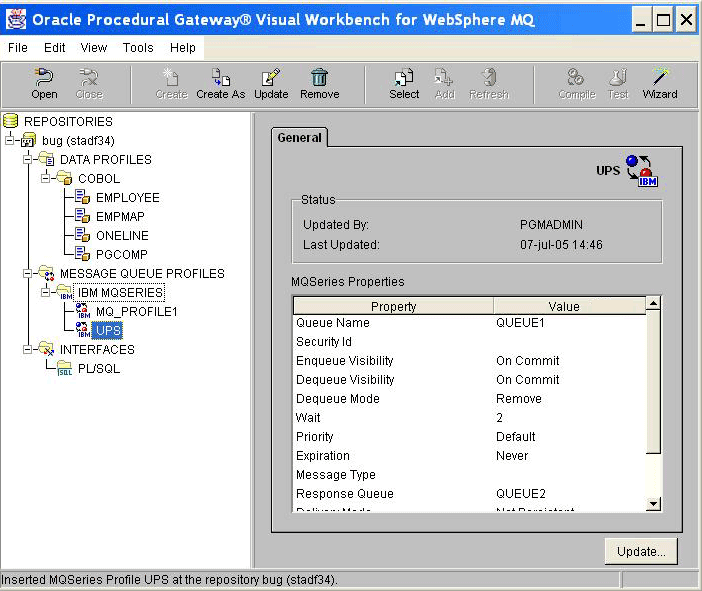
The following example shows a newly created message queue profile named UPS and its properties. (Refer to Figure 6-10.)
Figure 6-10 Message Queue Profile Example
The following example describes how to update a message queue profile:
Open the PG4MQ Visual Workbench repository.
Open the Message Queue Profiles folder.
Open the WebSphere MQ folder.
Select the message queue profile to update by clicking it once.
Click the Update icon in the tool bar.
The Message Queue Properties dialog box appears.
See Also:
"Creating a Message Queue Profile" for details about this dialog boxModify the properties as necessary, then click Apply.
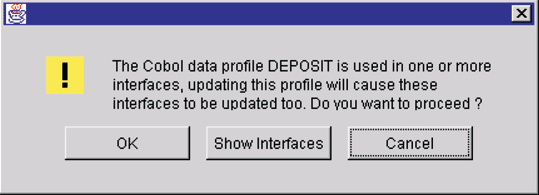
Updating a message queue profile that is associated with an interface updates the interface profile and the generated MIP. If the message queue profile you are updating is being used by an interface profile, then a message prompts you to confirm the change. (Refer to Figure 6-11.)
Figure 6-11 Dialog Box to Confirm a Change
The following example shows how to remove a message queue profile from the repository:
Open the PG4MQ Visual Workbench repository.
Open the Message Queue Profiles folder.
Open the WebSphere MQ folder.
Select the message queue profile to update by clicking it once.
Click the Remove icon in the tool bar.
A dialog box asks you to confirm the removal. (Refer to Figure 6-12.)
Figure 6-12 Dialog Box to Confirm Removal of a Profile

Click OK to remove the message queue profile.
Removing a message queue profile that is associated with an interface removes the message queue profile both from that interface profile and from the generated MIP. If the message queue profile you are removing is being used by an interface profile, then a message prompts you to confirm the change.
After creating one or more data profiles and one message queue profile, you are ready to create an interface profile. To create an interface profile, you use the PG4MQ Visual Workbench Wizard to select one or more data profiles and one message queue profile. After you have selected the profiles, the PG4MQ Visual Workbench uses the profile information to generate a MIP. The MIP provides a PL/SQL interface that defines the exchange and conversion of messages between your Oracle application and the non-Oracle application.
You can start the Wizard by clicking the Wizard icon in the PG4MQ Visual Workbench tool bar to start the Wizard (for a description of another way to start the Wizard. The Welcome window appears. (Refer to Figure 6-13)
Click Next to see the next Wizard window, and select Create New Interface. (Refer to Figure 6-14.)
Click Next to begin the Wizard's step-by-step instructions to:
Enter a PG4MQ Visual Workbench repository name
Name the interface profile, which becomes the name of the generated MIP
Specify a database link
Add one data profile
Add one message queue profile
Click Finish after verifying your selections, signaling the PG4MQ Visual Workbench to generate the MIP code
If you need help using the Wizard, then click Help.
Another way to start the Wizard to create an interface is to:
Open a PG4MQ Visual Workbench repository
Open the Interfaces folder
Select the PL/SQL folder
Click the Create icon on the tool bar. The Create New Interface window of the Wizard appears. (Refer to Figure 6-15.)
Figure 6-15 Create New Interface Window of Wizard
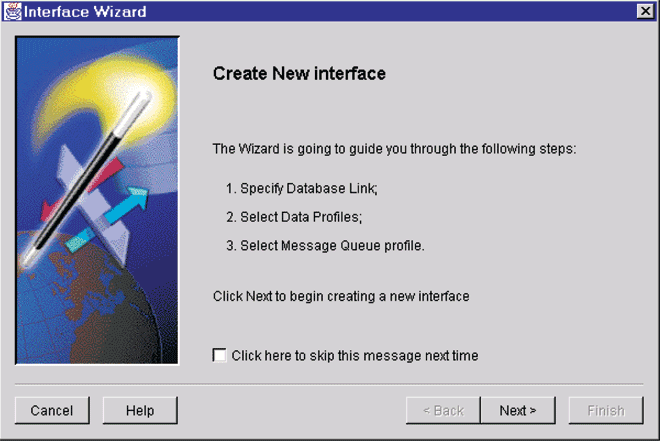
Click Next to begin the Wizard's step-by-step instructions to:
Name the interface profile, which becomes the name of the generated MIP
Specify a database link
Add one data profile
Add one message queue profile
Click Finish after verifying your selections, signaling the PG4MQ Visual Workbench to generate the MIP code
If you need help using the Wizard, then click Help.
Note:
The MIP generated with this release of the PG4MQ Visual Workbench is not compatible with the MIP released with the PG4MQ Visual Workbench release 9.2.0.x.x and earlier. You must modify applications that use the Beta version of the MIP.The PG4MQ Visual Workbench repository is not compatible with the MIP released with the PG4MQ Visual Workbench release 4.0.1.1.1 and earlier. You must re-create interface profiles that were created and stored in the repository with the beta release.
After you create an interface profile with the Wizard, the PG4MQ Visual Workbench generates:
The new MIP
MIP templates that show you how to use the generated MIP, the template code can be used as the starting point for development.
See Also:
"Using the MIP Templates" for more information about MIP templatesThe following example shows generated code packages for a MIP named DO_DEPOSIT. (Refer to Figure 6-16.)
To see the MIP or template code, select the PL/SQL Code tab. Select an entry from the PL/SQL code list by clicking its name once, andthen clicking View Code.... The Code Viewer window appears.
The example shown in Figure 6-17 illustrates the MIP specification for the MIP named DO_DEPOSIT.
You might need to update a MIP if, for example, you need to add or remove data profiles or change the message queue profile. To update a MIP, start the PG4MQ Visual Workbench and connect to a repository.
See Also:
"Starting the PG4MQ Visual Workbench and Connecting to a Repository" for more informationYou can start the Wizard by clicking the Wizard icon in the PG4MQ Visual Workbench tool bar. The Welcome window appears. (Refer to Figure 6-18.)
See Also:
"Alternative method for starting the Wizard to update an interface" for a description of another way to start the WizardClick Next to see the next Wizard window, and select Update Existing Interface (if you previously did not enable the Welcome window, then this is the first window you see). Refer to Figure 6-19.
Click Next to begin the Wizard's step-by-step instructions to:
Select the repository, programming language, and MIP to update
Specify another database link if necessary
Create a new data profile, or update the selected data profile as necessary
Create a new message queue profile, or update the selected message queue profile
Click Finish after verifying your selections, signaling the PG4MQ Visual Workbench to generate updated MIP code
Another way to start the Wizard to update an interface is to:
Open a PG4MQ Visual Workbench repository
Open the Interfaces folder
Open the PL/SQL folder
Select the interface to update
Click the Update icon on the tool bar. The Update Interface window of the Wizard appears. (Refer to Figure 6-20.)
Figure 6-20 Updating an Interface Window for Wizard
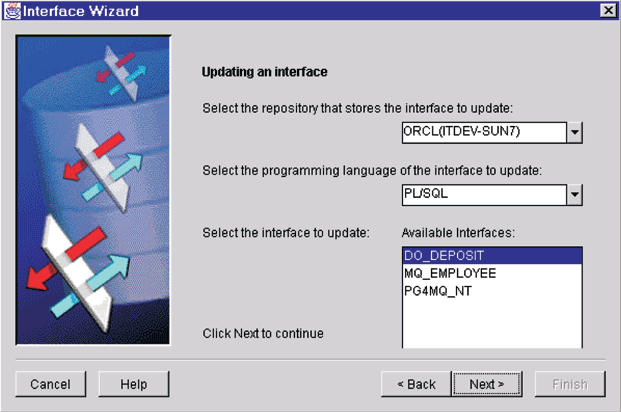
Click Next to begin the Wizard's step-by-step instructions to:
Specify a database link
Create a new data profile, or update the selected data profile as necessary
Create a new message queue profile, or update the selected message queue profile
Click Finish after verifying your selections, signaling the PG4MQ Visual Workbench to generate updated MIP code.
If you need help using the Wizard, then click Help.
When you create a MIP, the PG4MQ Visual Workbench generates gateway test code. Use this code to test the message queuing gateway associated with the MIP.
To test the ENQUEUE operation, the gateway test code sends a string of numbers through the message queuing gateway to the queue specified by the message queue profile. The result of the test appears on a status panel.
To test the DEQUEUE operation, the gateway test code tries to retrieve a message, through the gateway, from the message queue specified by the message queue profile. The result of the test appears on a status panel.
To test the gateway:
Open the PG4MQ Visual Workbench repository.
Open the Interfaces folder.
Open the PL/SQL folder.
Select a MIP by clicking it.
Click the Test icon in the tool bar or the Test button on a panel.
The Message Interface Package Tester dialog box appears. By default, the PG4MQ Visual Workbench runs the gateway test on the computer where the repository resides. To conduct the test on a different server, select the Connection tab and modify the connection information.
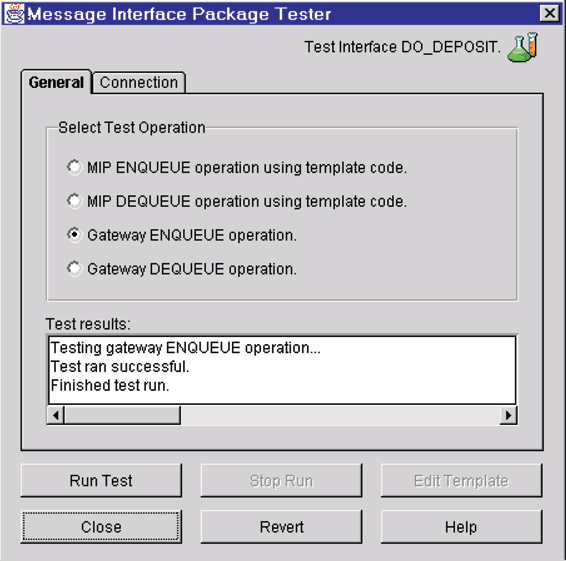
On the General panel, select Gateway ENQUEUE Operation. (Refer to Figure 6-21.)
Figure 6-21 Dialog Box for Message Interface Package Tester
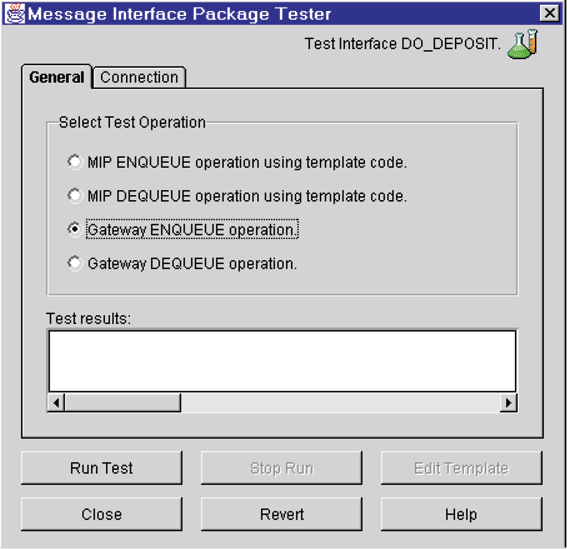
Click Run Test. The Message Interface Package Tester shows the result of the test. The test fails if the database link is not set correctly, or if the gateway is not functioning properly.
In the example shown in Figure 6-22, the ENQUEUE operation successfully sent a message to the local queue.
Figure 6-22 Dialog Box for Message Interface Package Tester
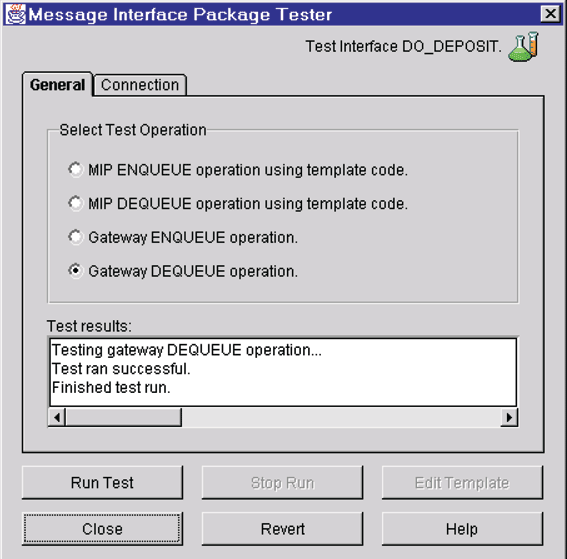
Choose Gateway DEQUEUE Operation.
Click Run Test. The Message Interface Package Tester shows the result of the test. In the example shown in Figure 6-23, the DEQUEUE operation successfully retrieved a test message from the local queue.
Figure 6-23 Dialog Box for Message Interface Package Tester
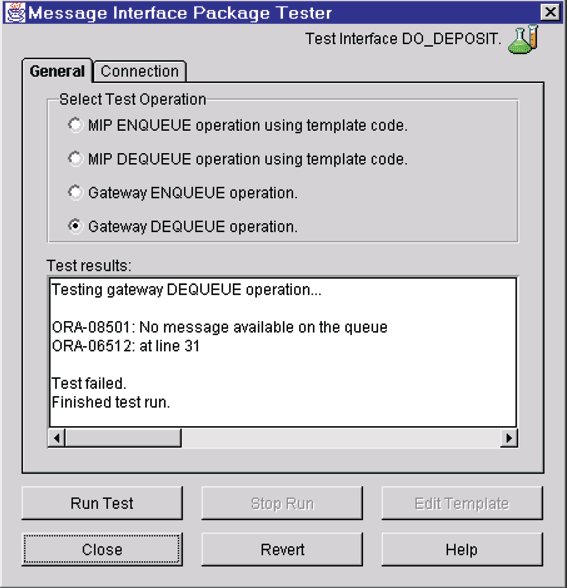
Leave Gateway DEQUEUE operation set.
Click Run Test again, to test that the last DEQUEUE operation retrieved the message. The Message Interface Package Tester shows the result of the test. If the only message on the queue is the one you sent in step 7, then the DEQUEUE operation fails because that message had already been retrieved. (Refer to Figure 6-24)
Figure 6-24 Dialog Box for Message Interface Package Tester
After testing the message queue profile against the gateway, compile the MIP. After compiling the MIP, you can use the template code to test it.
Note:
"Using the MIP Templates" for more information about MIP templatesTo compile a MIP:
Open the PG4MQ Visual Workbench repository.
Open the Interfaces folder.
Open the PL/SQL folder.
Select the MIP to compile by clicking it.
Click the Compile icon in the tool bar or the Compile button on a panel. The Message Interface Package Compiler dialog box appears:
Figure 6-25 Dialog Box for Message Interface Package Compiler
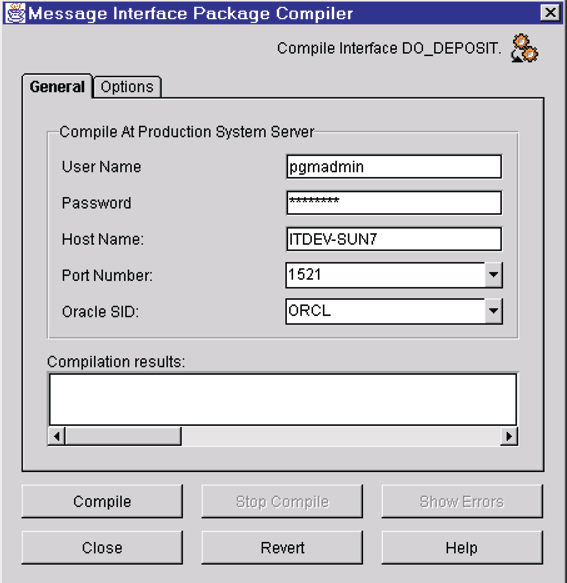
By default, the PG4MQ Visual Workbench compiles the MIP on the Oracle server where the repository resides. Verify that the connection information is correct for the Oracle server on which you will compile the MIP, and modify it if necessary.
Select the Options tab if you want to set a compile option that removes generated packages if there are compile errors.
Click Compile. The Compilation Results window shows the progress of the compile. After the MIP is compiled with no errors, it is ready for use.
If the compile fails, then click Show Errors to see the list of compilation errors. Figure 6-26 shows the Error Messages dialog box.
Figure 6-26 Dialog Box for Error Messages
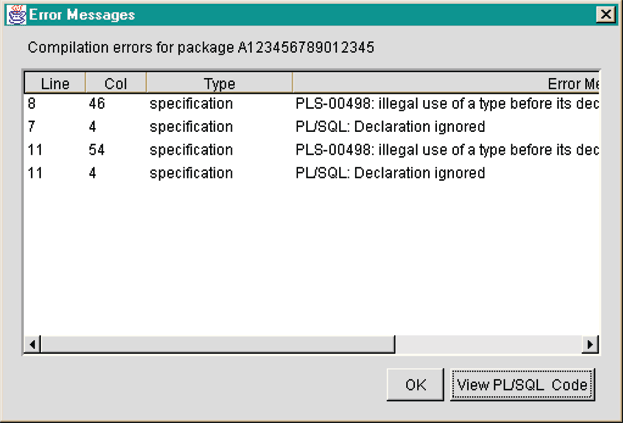
Click View PL/SQL Code to see the PL/SQL code location of the error.
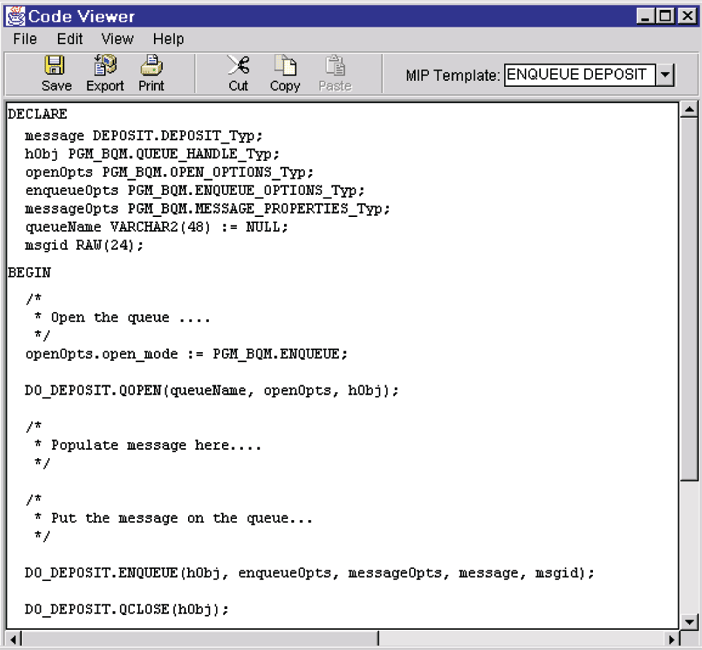
When you create a MIP, the PG4MQ Visual Workbench generates a template for each ENQUEUE and DEQUEUE procedure specified in the MIP. The templates demonstrate how the MIP is used in a PL/SQL program and how it can be used to verify the generated MIP and the data conversion package.
See Also:
Chapter 7, "Using the Generated MIP" for more informationTo see the MIP templates:
Open the PG4MQ Visual Workbench repository.
Open the Interfaces folder.
Open the PL/SQL folder.
Select the interface whose templates you want to see, by clicking it once.
Select a template from the list in the PL/SQL code panel by clicking its name. In the example shown in Figure 6-27, the ENQUEUE DEPOSIT template is selected for the MIP named DO_DEPOSIT.
Figure 6-27 ENQUEUE DEPOSIT template for MIP named DO_DEPOSIT
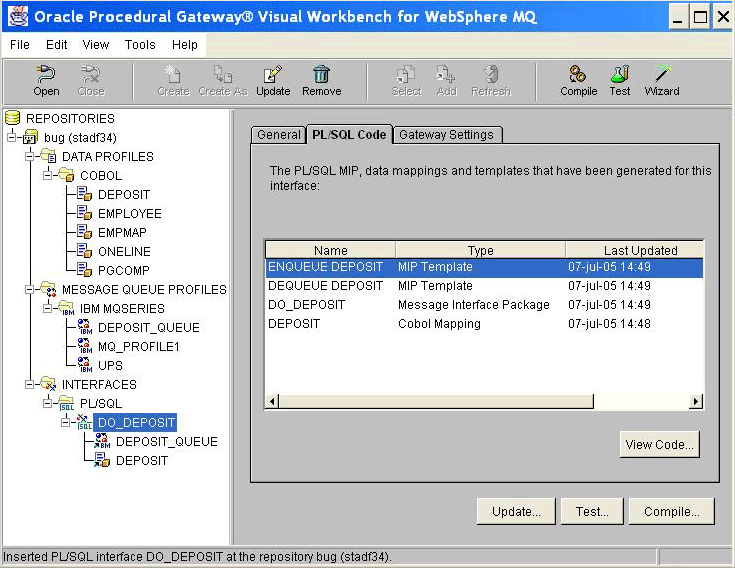
To see the template code, click View Code. Figure 6-28 shows the sample ENQUEUE DEPOSIT template code for the MIP named DO_DEPOSIT.
Figure 6-28 Code Viewer with Sample ENQUEUE DEPOSIT Template Code
Before you use the MIP template code, you must first:
Compile the MIP on the Oracle server where the template code will be run.
See Also:
"Compiling the MIP" for more informationAdd code to the template.
See Also:
"Completing the Templates"Before testing an ENQUEUE template, complete the template code by filling in the message variable fields. Testing the ENQUEUE template fails if the fields of the message variable are not set before calling the ENQUEUE procedure. A DEQUEUE template can run if you do not modify it, but you usually add code to process the retrieved message after the DEQUEUE procedure is called.
To add code to the sample:
Open the PG4MQ Visual Workbench repository.
Open the Interfaces folder.
Open the PL/SQL folder.
Select a MIP by clicking it.
Select the PL/SQL Code tab.
Select a MIP template from the list and click View Code.... The Code Viewer appears.
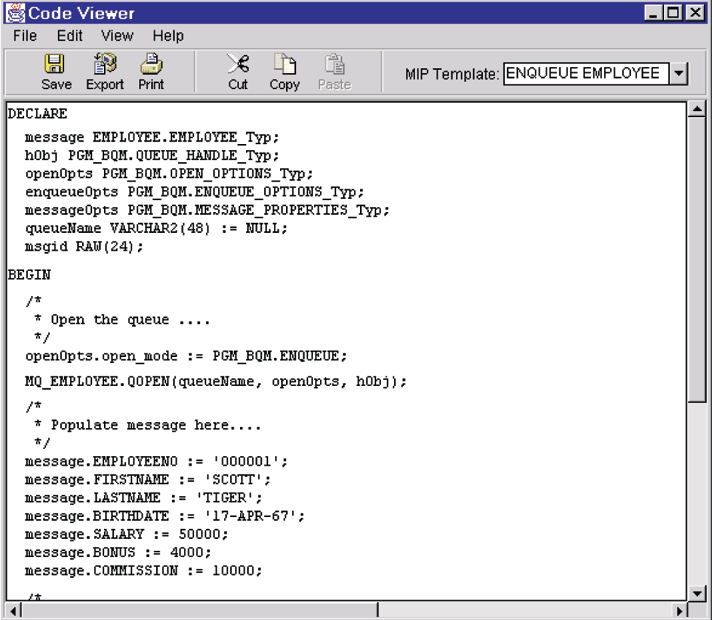
Fill in the message buffer for each data profile. Use the MIP Template drop-down list to open the template for each data profile in the MIP.
Click the Save icon in the tool bar to save your changes in the repository.
Figure 6-29 shows that code has been added to the ENQUEUE sample code to specify employee information.
Figure 6-29 Code Viewer with ENQUEUE Sample of Employee Information
Before testing a template, ensure that the MIP has been compiled on the Oracle server where you will run the test and that you have added code for all the data profiles in the MIP.
Open the Interfaces folder.
Open the PL/SQL folder.
Select a MIP by clicking it.
Click the Test icon on the tool bar or the Test... button on a panel. The Message Interface Package Tester dialog box appears. By default, the PG4MQ Visual Workbench runs the test on the Oracle server where the repository resides. To conduct the test on a different server, select the Connection tab and modify the connection information.
On the General panel, choose MIP ENQUEUE operation using template code. (Refer to Figure 6-30.)
Figure 6-30 Dialog Box for Message Interface Package Tester
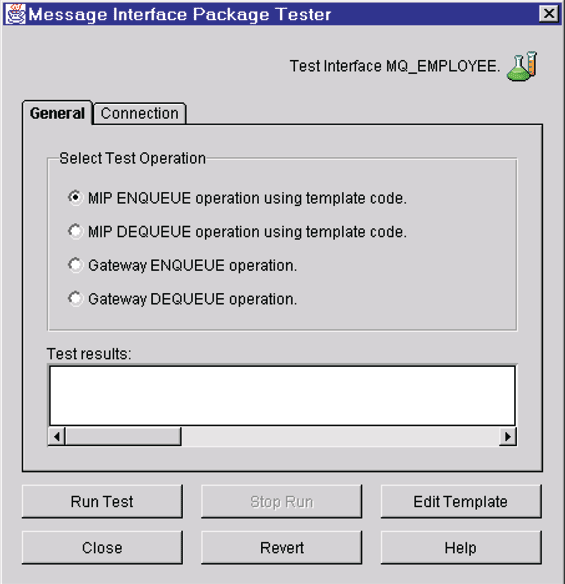
Click Run Test. When the test completes, the results appear in the Test Results window. To see the test code for details of the test, click Edit Code.
Open the Interfaces folder.
Open the PL/SQL folder.
Select a MIP by clicking it.
Click the Test icon on the tool bar or the Test... button on a panel. The Message Interface Package Tester dialog box appears. By default, the PG4MQ Visual Workbench runs the test on the Oracle server where the repository resides. To conduct the test on a different server, select the Connection tab and modify the connection information.
On the General panel, choose MIP DEQUEUE operation using template code, as illustrated in Figure 6-31.
Figure 6-31 Dialog Box for Message Interface Package Tester
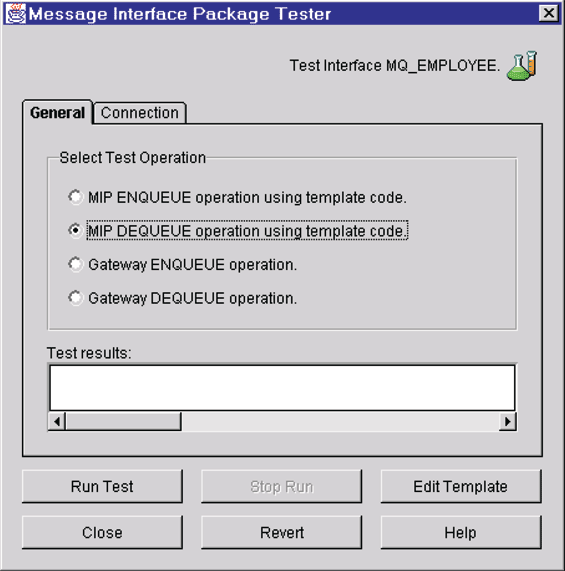
Click Run Test. When the test completes, the results appear in the Test Results window. To see the test code for details of the test, click Edit Code.
Note:
TheDEQUEUE test reports success when it has retrieved a message from the queue. All exceptions are reported in the test results panel. A "no messages available" exception appears when an application tries to dequeue a message when there are no more messages on the queue.
The "no messages available" exception might result if the Wait Interval is set in the message queue profile and there are no more messages on the queue:
The DEQUEUE test waits the specified amount of time and then reports the exception.
If the Wait Interval is not set and no messages are on the queue, then the DEQUEUE test waits forever (the default).
See Also: "Creating a Message Queue Profile" for information about the Wait Interval.
After completing the development phase, deploy the MIP to one or more production Oracle servers where you plan to run your applications that use the MIP. Follow the instructions in this chapter to prepare the MIP for use in a production system.
You must compile the MIP on the Oracle production server before your applications can use the MIP. The following requirements must be met before you compile a MIP at the production Oracle server:
A SQL*Net listener for the production Oracle server must be running. Refer to your Oracle SQL*Net documentation for information.
The tnsnames.ora file on the production Oracle server must contain an entry specifying the procedural gateway. Refer to the gateway installation guide for your platform for information.
A database link to the procedural gateway must be created at the production Oracle server to match the name of the database link that was used when you defined the interface profile for the MIP. Refer to the gateway installation guide for your platform for information about creating database links.
The PL/SQL packages DBMS_OUTPUT, DBMS_PIPE and UTL_RAW must exist in the production Oracle server. If they are not present, then see your DBA about installing these packages.
The PL/SQL packages PGM, PGM_BQM, PGM_SUP, and UTL_PG are also required in the production Oracle server. If they are not present, then run the deployment script on the production Oracle server before compiling the MIP.
See Also:
Appendix A, "Preparing the Production Oracle Server" for more informationIf any of these requirements are not met, then the PG4MQ Visual Workbench reports an error when you try to compile.
When you compile the MIP for a production Oracle server, the PG4MQ Visual Workbench reads the MIP code from the repository, establishes a connection with the designated production Oracle server, compiles the MIP, and stores the compiled MIP as an object in the production Oracle server.
To compile the MIP for the production system server:
Open the PG4MQ Visual Workbench repository.
Open the Interfaces folder.
Open the PL/SQL folder.
Select the MIP to compile by clicking it.
Click the Compile icon in the tool bar or the Compile button on a panel. The Message Interface Package Compiler dialog box appears ("Compiling the MIP" shows this dialog box).
Change the User Name, Password, Host Name, Port Number, and SID fields to specify the production Oracle server.
Decide if you want to grant execution privileges to other Oracle users for this MIP before you compile or after you compile the MIP:
Grant before compiling: Select the Options tab of the Message Interface Package Compiler dialog box and select the Grant public access to the packages option. Go to step 8.
Grant after compiling: Continue to step 8 to compile the MIP.
See Also:
"Granting Execution Privileges to a MIP" for more informationClick Compile.
The MIP packages are compiled on the production Oracle server in the schema of the user specified with the connection information. If the compiled MIP packages are used by other Oracle users, or by applications that are run by another user, then you must grant execution privileges to those users.
You can grant execution privileges during the MIP compilation procedure as described under "Compiling the MIP for the Production Oracle Server" or use the GRANT statement at the computer where the production Oracle server resides. GRANT has this syntax:
GRANT EXECUTE ON MIP_name TO {user_name | PUBLIC}
See Also:
Oracle Database SQL Reference for more information aboutGRANTAfter you have successfully compiled the MIP on a production Oracle server, you can test it there. The PG4MQ Visual Workbench reads the test code package from the PG4MQ Visual Workbench repository and runs it on the production system.
See Also:
"Testing the Gateway" for information about navigating to the Message Interface Package Tester dialog boxModify the connection information in the Message Interface Package Tester dialog box to specify the production Oracle server for the test, instead of using the default Oracle server where the repository resides.
See Also:
"Using a Template to Test the MIP" for instructions on running the test