| Oracle® Configuration Manager Installation and Administration Guide 10g Release 2 (10.2) Part Number B28484-02 |
|
|
View PDF |
| Oracle® Configuration Manager Installation and Administration Guide 10g Release 2 (10.2) Part Number B28484-02 |
|
|
View PDF |
This chapter provides detailed instructions about installing Oracle Configuration Manager. It also describes the procedure to prepare a database for configuration collections. It contains the following sections:
Before installing Oracle Configuration Manager, ensure that all the following pre-installation requirements are met:
You must ensure that the required JDK version (1.2.2 or later on Unix, and 1.3.1 or later on Windows) is present in the ORACLE_HOME directory of the system on which Oracle Configuration Manager is being installed or the JAVA_HOME environment variable is pointing to the appropriate JDK directory.
You must have your Customer Support Identifier (CSI) and your Oracle MetaLinkUserName with you as they are required while installing Oracle Configuration Manager.
You must specify a valid Country Code while installing Oracle Configuration Manager. Country codes are associated with the Oracle MetaLinkUserName. Refer to the Oracle Metalink site (http://metalink.oracle.com) if you encounter registration failures and are uncertain that the correct country code has been specified. The country associated with the Oracle MetaLinkUserName can be found in the Profile section under the Licenses link. For a list of valid country codes, refer to Appendix A .
Oracle Configuration Manager can be distributed and installed in different ways. You can install Oracle Configuration Manager using either of the following methods:
Download the standalone install kit from the Oracle Metalink site (http://metalink.oracle.com) and install Oracle Configuration Manager using the Command Line Interface. For more information, refer to Chapter2, "Installing Oracle Configuration Manager Using the Command Line Interface".
Oracle Configuration Manager is also bundled with new product releases and in patchsets. Use the Oracle Universal Installer to collect user information, install, and configure Oracle Configuration Manager. For more information, refer to Chapter2, "Installing Oracle Configuration Manager Using the Oracle Universal Installer".
After installation, you can reconfigure the proxy server, the CSI, MetaLinkUserName, or the Country-Code, by using either of the following options:
emCCR config: This command displays an user interface that allows you to modify the configuration details. For more information, refer to Chapter5, "emCCR config".
configCCR: This script allows you to modify the configuration information using the command line. When you run this script, the values entered earlier will be shown by default and can be changed. For more information, refer to Chapter5, "configCCR".
To install Oracle Configuration Manager using the Command Line Interface, follow these steps:
Log in as the ORACLE_HOME owner.
Unzip the Oracle Configuration Manager distribution file into the ORACLE_HOME directory as follows:
$unzip -d $ORACLE_HOME ccr-Production-10.2.4.0.0-<OS_NAME>-<CHIP_ARCH>.zip
The name of the platform-specific distribution file for Oracle Configuration Manager is ccr-Production-10.2.4.0.0-<OS_NAME>-<CHIP_ARCH>.zip where OS_NAME refers to the name of the operating system such as Linux, AIX, Windows and <CHIP_ARCH> refers to the base architecture such as i386, x86 and so on.
After the file has been unzipped, install and complete the configuration of Oracle Configuration Manager by entering the following command:
$ORACLE_HOME/ccr/bin/setupCCR -s -p <proxy> <CSI> <MetaLinkUserName> <Country-Code>
The parameters are as follows:
The -s parameter indicates the acceptance of the Oracle Configuration Manager license agreement. This parameter is optional and if you do not specify this parameter, the license agreement is displayed. You must accept the agreement to proceed with the installation.
Note:
If you do not accept the license agreement, you cannot install Oracle Configuration Manager.The -p parameter is used to specify the proxy server information needed to connect to the Internet. This parameter is used for the host, port and authentication information of the proxy server. This parameter is optional and if it is not specified, no proxy server information will be used to connect to the Oracle server. The format is as follows:
<proxy-user>/<proxy-pwd>@<proxy-host>:<proxy-port>
If the proxy-user is specified without the proxy-pwd, (<proxy-user>@<proxy-host>:<proxy-port>), you will be prompted to enter the password.
If the proxy-user is not specified (<proxy-host>:<proxy-port>), a proxy server will be used for the connection, but will not be authenticated.
If a default proxy-port is to be used, any of the following is a valid proxy string:
<proxy-host>
<proxy-user>@<proxy-host>
<proxy-user>/<proxy-pwd>@<proxy-host>
CSI is the Customer Support Identifier. Your CSI number can be found in the Profile section of Oracle MetaLink under the Licenses link.
MetaLinkUserName is the Oracle Metalink User Name.
Country-Code is the customer's country code. For a list of valid country codes, refer to Appendix A .
If you do not specify CSI, MetaLinkUserName, or Country-Code, you will be prompted to do so.
After you have completed the configuration, Oracle Configuration Manager will begin to collect and upload configuration data. If there is a database in the ORACLE_HOME directory, or if you are using Oracle Configuration Manager in an Oracle E-Business installations in an Oracle Enterprise Manager Grid Control installation, you must execute the database collection scripts to enable the collection of the database configuration data. Refer to Chapter2, "Preparing the Database for Configuration Collections" for details.
Sample setupCCR Command Output
$ORACLE_HOME/ccr/bin/setupCCR -s 1234566 my_id us
** Installing base package **
Deploying core - Version 10.2.4.0.0

** Registering installation with Oracle Configuration Manager server(s) **
Deploying engines - Version 10.2.2.0.2
Deploying metricdata - Version 10.2.4.0.0
Deploying scripts - Version 10.2.4.0.0

** Getting package updates from ContentServer **

** Starting the Oracle Configuration Manager Scheduler **
Oracle Configuration Manager - Release: 10.2.4.0.0 - Production
Copyright (c) 2005, 2006, Oracle. All rights reserved.
------------------------------------------------------
Starting Oracle Configuration Manager...
Waiting for status from Oracle Configuration Manager...
Start Date             09-Oct-2006   15:47:17
Last Collection Time   -
Next Collection Timne  10-Oct-2006   15:46:00
Collection Frequency   Daily at 15:46
Collection Status      scheduled collection running
Log Directory          /scratch/tboisver/asm19g/ccr/log

Oracle Configuration Manager successfully started.
Note:
If you are using a Unix system and you do not have access toCRON, you may encounter problems when installing Oracle Configuration Manager on Unix systems. To work around this problem, set the environment variable CCR_DISABLE_CRON_ENTRY to any value and retry the installation. You need to do this only if CRONTAB is a restricted operation.
If CRONTAB is restricted and you do not perform the workaround, the installation will fail. The installation failure will identify the log file where you can find the failure message.
An example of the failure message is as follows:
** Installing base package **
Deploying core - Version 10.2.4.0.0
Error encountered in package deployment.
Check the contents of the deployment log -
/u01/app/oracle/products/10.3.0/database/ccr/log/install-core-03-02-2006_10.42.45.892950000.log
This log contains the output captured during installation, and will indicate the reasons for the failure.
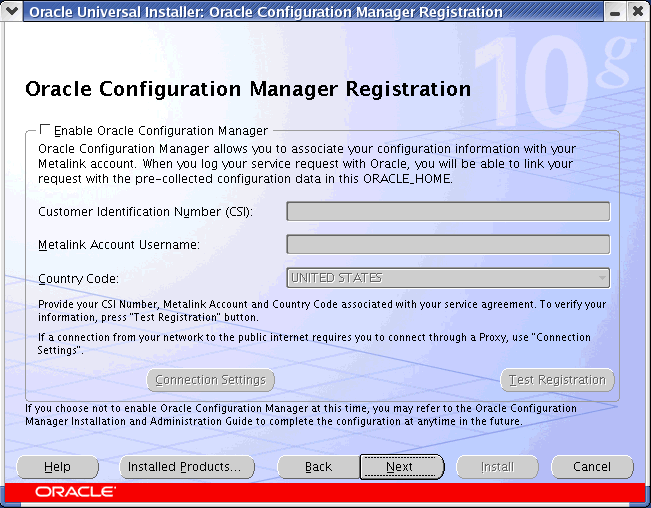
Oracle Configuration Manager may be bundled with another product release or patchset and can be installed using the Oracle Universal Installer. When you are installing the product release or patchset with which Oracle Configuration Manager has been included, Figure 2-1 is displayed.
Figure 2-1 Oracle Configuration Manager Registration Screen (Initial Screen)

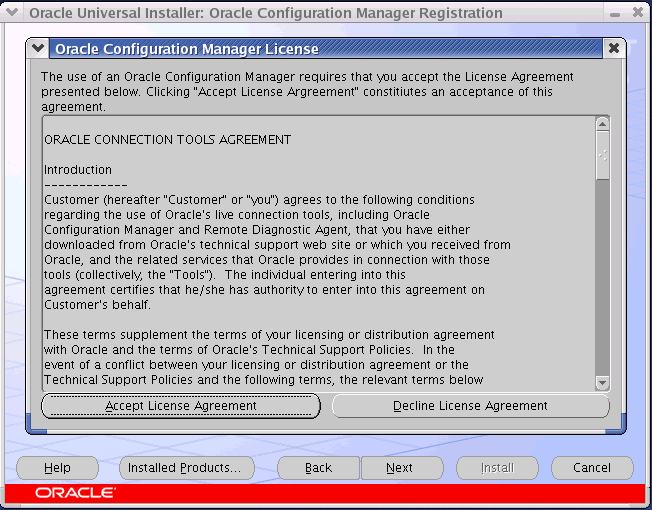
Click Enable OCM to proceed to the Oracle Configuration Manager License Agreement screen. Figure 2-2 is displayed.
Figure 2-2 Oracle Configuration Manager License Agreement Screen

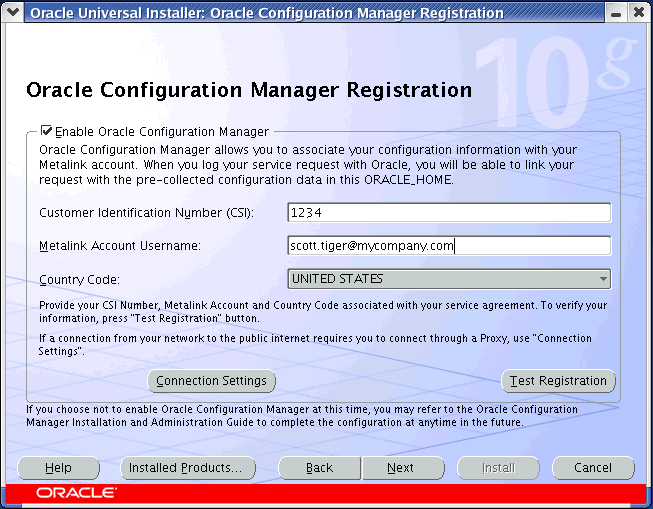
Click Accept License Agreement to accept the license agreement. Figure 2-3, Oracle Configuration Manager Registration page is displayed.
If you decline the license agreement, click Next on the Oracle Configuration Manager Registration page to complete the installation. Oracle Configuration Manager will be installed but not configured. You can configure Oracle Configuration Manager after installation by running the setupCCR command. For more information on the setupCCR command, refer to the Installing Oracle Configuration Manager Using the Command Line Interface section.
Figure 2-3 Oracle Configuration Manager Registration Screen

To associate the configuration data with your Oracle Metalink Account, specify the Customer Support Identifier (CSI), Metalink Account Username and Country Code that corresponds to the support agreement. If you need to specify the proxy server settings, click Connection Settings to go to Figure 2-4.
Click Test Registration to verify that the registration information is correct and click Next to continue with the installation. You cannot proceed past this page until the credentials have been successfully verified.
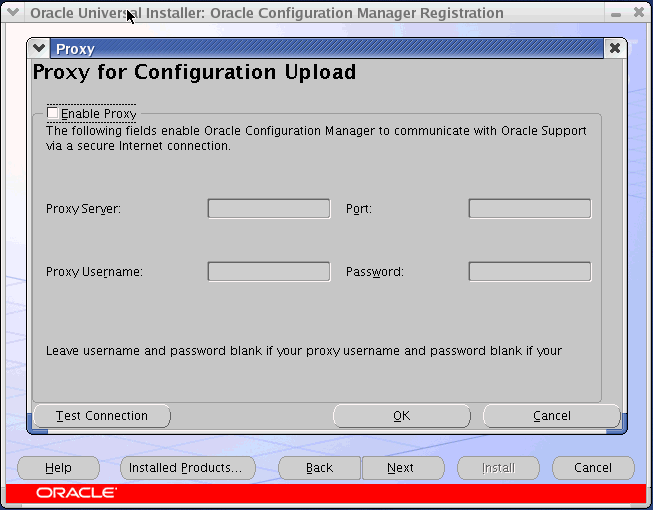
Figure 2-4 Oracle Configuration Manager Proxy Screen

If you are using a proxy server to access the Internet, check Enable Proxy and enter the following proxy server configuration details or click Cancel and then click Next to continue with the installation.
Enter the host name and port number of the proxy server. For example, you can specify the proxy server settings as follows:
Proxy Server: www-fooproxy.here.com
Port: 80
If the proxy server requires authentication, you must specify the credentials in the Proxy Username and Password fields.
After you have entered the proxy server information, click Test Connection to test the connection between your local host and the Oracle Configuration Manager service. When you click Test Connection, the connectivity test is performed and the 'success' or 'failure' dialog is displayed. If the connectivity test fails, an error message is displayed on the screen. Connectivity errors are also logged in the installation log file. You can proceed with the installation only if you have successfully verified the connection. Click OK and then click Next to continue with the installation. The Installation Summary page is displayed.
At the end of the installation, Oracle Configuration Manager's Configuration Assistant is displayed. The Configuration Assistant displays the success or failure of the installation. If the installation has failed, check the install log files and the Oracle Configuration Manager installation log files in the $ORACLE_HOME/ccr/log directory.
If you have installed OCM in a home that contains of a database, you must run a script to create a database account to collect database configuration collections. This account stores the PL/SQL procedures that collect the configuration information, and the account owns the database management system (DBMS) job that performs the collection. After the account has been set up, as login privileges are no longer required, the account is locked.
Note:
Because the collected configuration data is not stored in the database, additional disk space is not required for the database.
Because database configuration collections are performed using the database jobs, the job_queue_process initialization parameter must have a value greater than 0 for pre-10g databases only.
Before running the installCCRSQL.sh (Unix) or installCCRSQL.exe (Windows) script to prepare the database for configuration collection, you must perform the following steps for pre 9.2 databases:
Edit the init<sid>.ora file where sid is the database system identifier, and set the UTL_FILE_DIR parameter to include $ORACLE_HOME/ccr/state as one of the directories.
If a server parameter file (spfile) is used, alter the UTL_FILE_DIR parameter using the following SQL*Plus command:
SQL>alter system set utl_file_dir=<value> scope=spfile
where value is equal to $ORACLE_HOME/ccr/state
Restart the database.
To configure the database for configuration collection, perform the following steps:
Run the following script:
$ORACLE_HOME/ccr/admin/scripts/installCCRSQL.sh collectconfig -s <SID> -r <SYSDBA-USER> -p <SYSDBA-PASSWORD>
The installCCRSQL.sh (Unix) or installCCRSQL.exe (Windows) script creates an Oracle Configuration Manager user and loads the PL/SQL procedure into the database defined by the ORACLE_SID. You can also specify the database <SID> by using the -s option in the command line as in the following example where the <SID> is orcl:
$ORACLE_HOME/ccr/admin/scripts/installCCRSQL.sh collectconfig -s orcl
By default, the connection to the database is through OS authentication, "/as sysdba." To specify a different SYSDBA user and password, you can use these options:
-r <SYSDBA-USER>: The login name of the SYSDBA user
-p <SYSDBA-PASSWORD>: The password for the SYSDBA user
For Oracle Real Application Cluster databases (RAC), you must run the database script against only one instance, but Oracle Configuration Manager must be installed in all instance homes.
Note:
If the Oracle Configuration Manager account already exists, when you run the installCCRSQL.sh script, it will be dropped and re-created.
If you are upgrading from a 9.x database version to a 10.x version, you must run the installCCRSQL.sh script again to record the upgraded version.
If the database is used as a repository for an Oracle E-Business Suite, you must also run the following script from the ORACLE_HOME in which the E-Business database has been hosted:
$ORACLE_HOME/ccr/admin/scripts/installCCRSQL.sh ebs_collectconfig -u <Oracle_Applications_User>
The -u parameter is mandatory. If you do not specify this parameter, you will be prompted for the Oracle Applications User. If the -u parameter is specified, you will be prompted for the Oracle Applications Password.
If you want to automate the install, you can run the installCCRSQL.sh script with an additional -w option to specify the Oracle Applications Password. For example:
$ORACLE_HOME/ccr/admin/scripts/installCCRSQL.sh ebs_collectconfig -u <Oracle_Applications_User> -w <Oracle_Applications_Password>
You can add the -s <SID> command to specify the SID of the Oracle Applications Database instance.
If you are not using OS authentication to connect to the database, you must use the -r and -p parameters to specify the following:
-r <SYSDBA-USER>: The login name of the SYSDBA user
-p <SYSDBA-PASSWORD>: The password for the SYSDBA user
If the -r parameter is specified, the -p parameter is optional and will be prompted for.
If the database is used as a repository for Oracle Enterprise Manager Grid Control, you must also run the following script:
$ ORACLE_HOME/ccr/admin/scripts/installCCRSQL.sh collectemrep
When you run this command, you will be prompted for the SYSMAN password. If you want to automate the install, you can run the installCCRSQL.sh script to specify the SYSMAN password. For example:
$ORACLE_HOME/ccr/admin/scripts/installCCRSQL.sh collectemrep -e <SYSMAN PASSWORD>
You can add the -s <SID> command to specify the SID of the Oracle Enterprise Manager Grid Control Database instance. You must run this script from the ORACLE_HOME in which the Oracle Enterprise Manager Grid Control database has been hosted.
If you are not using OS authentication to connect to the database, you must use the -r and -p parameters to specify the following:
-r <SYSDBA-USER>: The login name of the SYSDBA user
-p <SYSDBA-PASSWORD>: The password for the SYSDBA user
If the -r parameter is specified, the -p parameter is optional and will be prompted for.
To uninstall Oracle Configuration Manager, follow these steps:
If the ORACLE_HOME directory contains a database, remove the Oracle Configuration Manager user and the associated objects from the database as follows:
SQL> ORACLE_HOME/ccr/admin/scripts/dropocm.sql
If the database is a repository for the Oracle E-Business Suite, log in to the database as an SYSDBA user and remove the additional objects from the database as follows:
$ORACLE_HOME/ccr/admin/scripts/ebs_dropccr.sql <Oracle_Applications_User>
If the database is a repository for Oracle Grid Control, log in to the database as the SYSMAN user and remove the additional objects from the database as follows:
$ORACLE_HOME/ccr/admin/scripts/dropemrep_collect.sql
To stop the Scheduler and remove the service or the crontab entry, enter the following command:
$ORACLE_HOME/ccr/bin/deployPackages -d $ORACLE_HOME/ccr/inventory/core.jar
Delete the ccr directory by entering the following command:
$rm -rf $ORACLE_HOME/ccr
Oracle Configuration Manager is successfully uninstalled.